Radial pump master cylinder: assembly instructions and replacement of the brake master cylinder or radial clutch.
A practical guide for beginners and experts to replace the original axial pump with one Master cylinder radial, brake or clutch.
Step 1: How to disassemble
First of all, start removing the components that impede the passage of the tools and the clutch brake pump, such as fairing or fairing in the case of sports bikes. Before proceeding we recommend protecting with paper the parts that could come into contact with the brake fluid which is very corrosive, or in any case that could be scratched with tools or with the pump itself.
Disassembly phase:
-Unscrew the brake pipes screw or l'idrostop in the second case it will be necessary to disconnect the cable from the electric system of the motorcycle.
- Completely unscrew the screw or the hydrostop to disconnect the brake pipes, take care not to pump on the lever and not to drip too much liquid on the exposed parts of the motorcycle. If drops of braking fluid end up on uncovered parts of the hull or motorcycle, immediately remove them with a cloth soaked in water to prevent them from corroding something.
- Remove the brake fluid reservoir if the original pump provided a separate brake fluid reservoir which could be used for the new radial pump, or replace the reservoir with a new one reservoir ergal oil brake.
If the standard pump has an integrated tank, leave everything closed to create an empty effect and do not let the brake fluid drip.
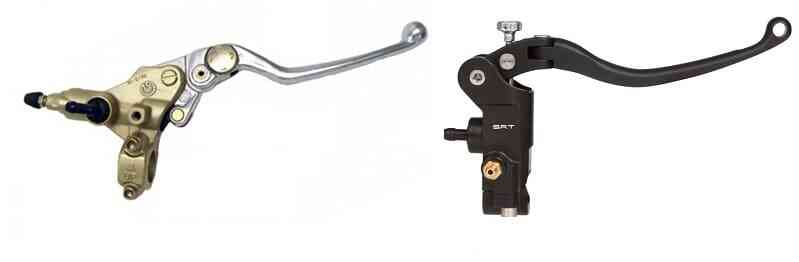
- Unscrew the screws of the jumper that blocks the pump on the handlebar or the handlebar and the original (axial) pump is finally disconnected.
Attention, it is very important to dispose of the brake fluid and all that is not needed at a special disposal center
(ecologic center) it is free and respects the environment.
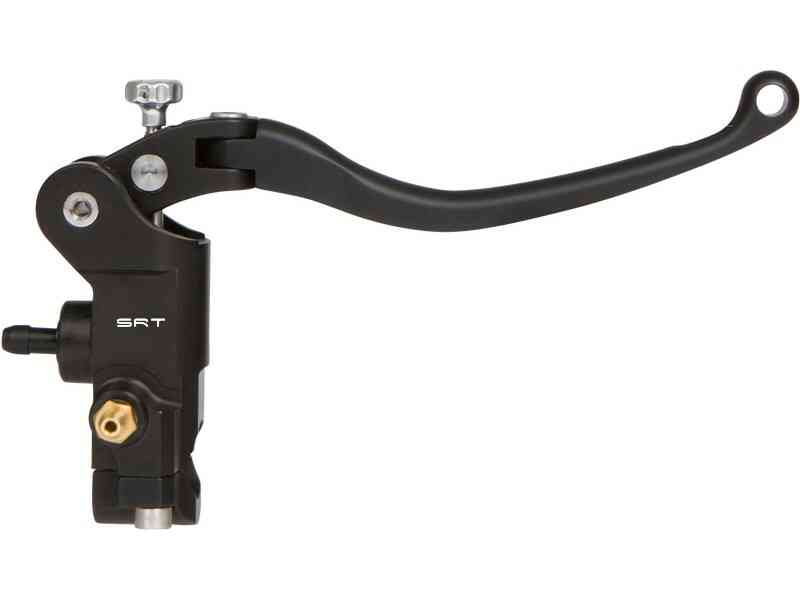
Step 2: installation of the new radial pump
- Unscrew the bolts of the radial pump bracket (3) and position the new radial pump on the handlebar or half-handlebars, tighten the screws and fix it momentarily in position.
- Fit the brake pipe by screwing the banjo fitting of the pipe (1) to the radial pump, check that the screw is compatible as a step with the new pump, you can see the differences between the various screws here after verifying that the connecting screw or hydrostops are compatible with the SRT radial pump (thread pitch M10x1).
- In some cases when mounting the radial pump, the original brake lines may be short due to the angle of the brake hose fitting, in this case there are two solutions:
A) replace the brake pipes
B) use a brake hose adapter to be mounted under the radial pump (here you find the adapter)
- Connect the tank support bracket (12) to the oil pan (6) and proceed to insert the connecting tube (7), you can reuse the old tank if available and compatible or one of our tanks and place everything correctly and in a stable way.
- Check that everything is in order and fixed and insert the brake fluid into the tank and bleed the air from the braking system (SEE THIS GUIDE TO BLEED THE BRAKES)
- After finishing the operation, get on the bike and place the pump in the most comfortable position, checking that the lever runs freely without hindrance even after reassembling any fairings or fairings.
It is extremely important to prevent the brake pipe from creating creases or bends that never exceed the height of the pump to prevent accumulations of air in the system which become difficult to eliminate. As a result, the pump will always be "spongy" and not very modulable.

Vuoi sapere come procedere allo spurgo dell'impianto frenante o della frizione? Leggi questa guida